Wilt From Fosters Home for Imaginary Friends
- zakicrochets
- May 10, 2023
- 5 min read

Materials:
Light/DK weight white yarn Worsted weight Red yarn Worsted weight White yarn Worsted weight Black yarn 4mm crochet hook- for worsted yarn 3mm crochet hook- for DK yarn White and blue felt Glue (I used hot glue gun) Wire Tapestry needle How to read this pattern: Abbreviations: MR = magic ring ch = chain sc = single crochet dc = double crochet dec = decrease (or sc2tog) inc = increase sl st = slip stitch f/o = fasten off A downloadable PDF is available for this pattern on my ravelry: https://www.ravelry.com/patterns/library/wilt-from-fosters-home-for-imaginary-friends
This pattern is written in US crochet terminology
Number in brackets at the end of line is the number of stitches in that round or row
The picture label is written on the picture, not as a caption
sc around means single crochet in every stitch of that round
Weave through ring is pretty much the same thing as weaving in ends; I just want to emphasize that it’s important to close the MR at the end, especially with the cheeks. This is done by sewing through all the outer loops of the last round and pulling tight
Yarn into means pull new loop of working yarn into that stitch. ch1 for extra stability, but that chain isn’t part of the round’s stitches
When multiple colors are used in one of the body parts, I change the font color. If there is no mention of yarn color assume its red worsted yarn
Head
Start by making 3 Cheeks:
R1: sc4 in a MR [4] R2: (inc, sc) x2 [6] R3: (sc2, inc) x2 [8] R4-5: sc around for two rounds [8] For first 2 cheeks, f/o here. On last cheek, DO NOT f/o, instead continue to R6: R6: (Have stitch marker in last st of previous round)
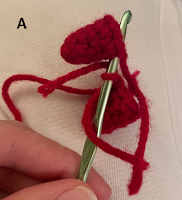
sc into any stitch of another cheek (See photo A), sc 3
sc into any stitch of the third cheek, sc 6
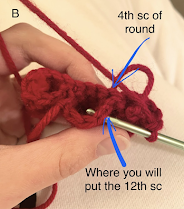
sc back into the second cheek in the stitch next to the one you left off on (see photo B). sc 3
sc back into the first cheek in the stitch next to the one you left off on (as in the case with photo B), sc2,
inc, sc4 [24]

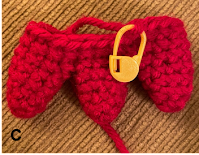
Make sure your stitch marker is in the same place as shown in photo C
R7: sc6, dec, sc11, inc, sc4 [24]
R8: sc around [24]
R9: sc18, dec, sc4, [23]
R10: sc17, dec, sc4 [22]
R11: sc around [22]
R12: sc17, dec, sc3 [21]
R13: sc17, inc, sc3 [22]
R14: sc around [22]
R15: sc17, inc, sc4 [23]
R16: sc18, inc, sc4 [24]
R17: sc around [24]
R18: sc7, inc, sc11, dec, sc3 [24]
You’ll now be sectioning off the work to form the cheeks on the right side of the face. The rows will be designated as R1A for row 1 of cheek A, R1B for row 1 for cheek B, etc. Make sure your stitch marker is in the stitch that the arrow is pointing to in image D **Stuff rows up to this point. As you form the cheek, push stuffing in to it to give it more shape R19A: ch1 (counts as st), sc into the 17th stitch of previous round, sc2, dec, sc 3 [8] R20-21A: sc around for 2 rounds [8] R22A: (sc2, dec) x2 [6] R23A: (sc, dec) x2 [4] f/o, weave through ring, pull yarn through center of cheek to try and round it out

19B: yarn into stitch 1, sc3, sc into stitch 13, sc3, sc into stitch 1 [8]
R20-21B: sc around for 2 rounds [8]
R22B: (sc2, dec) x2 [6]
R23B: (sc, dec) x2 [4]
f/o, weave through ring as above
R19C: yarn into stitch 1, sc3, sc into stitch 13, sc3, sc into stitch 1 [8]
R20-21C: sc around for 2 rounds [8]
R22C: (sc2, dec) x2 [6]
R23C: (sc, dec) x2 [4]
f/o, weave through ring as above

Stitch marker is in the LAST stitch of the previous round. Numbers in black show the stitch numbers from the LAST round.
Legs(make 2)
R1: sc5 in a MR [5]
R2-15: sc around for 15 rounds[5]
Change to worsted weight white yarn
R16-22: sc around for 7 rounds [5]
Change to black yarn
R23: sc around [5]
R24: dc3, sl st 2 (make slip stitches loose) [5]
R25: sc around [5]
R26: inc, sc, inc, sc2 [7]
R27: sc around [7]
R28: dec, sc, dec, sc2 [5]
f/o, weave through ring
Body
R1: sc6 in a MR [6]
R2: inc x6 [12]
R3: (inc, sc) x6 [18]
R4-6: sc around for 3 rounds [18]
R7: (sc, dec) x6 [12]
R8-10: sc around for 3 rounds [12]
Begin stuffing and continue to end
R11: (sc3, dec) x2 [10]
R12: sc around [10]
f/o, weave through ring
Big Eye
Eyeball using 3mm hook and White DK yarn
R1: sc4 in a MR [4]
R2: inc4 [8]
R3: (inc, sc) x4 [12]
R4-5: sc around for 2 rounds [12]
R6: (sc, dec) x4 [8]
R7: dec4 [4]
f/o and weave through ring
Eye stalk using 4mm hook and red worsted yarn
R1: sc4 in a MR [4]
R2-5: sc around for 5 rounds [4]
f/o
Sew eye onto eye stalk

Long Arm
R1: sc4 in MR [4]
R2-5: sc around for 5 rounds [4]
f/o, weave through ring
Little Arm
R1: sc4 in MR [4]
R2-16: sc around for 16 rounds [4]
Now making the fingers,
R17:
Finger 1: ch5, turn, sl st 4 back down chain, sl st into next sc of round
Finger 2: ch6, turn, sl st 5 back down chain, sl st into next sc of round
Finger 3: Repeat finger 2
Finger 4: Repeat finger 1
Wrist Band
Start with red yarn
R1: ch9 change to worsted white, ch1, turn
R2: Working in the back ridge loop of the chain, skip first stitch, sc8. Change to blue yarn, ch1, turn
R3: Working in the back post* loop of your previous stitches, sc8. f/o

See back ridge loops in photo H. these are the loops behind the classic V shape of the stitch you usually work into
Finishing up!

Sew the crocheted pieces together if you haven’t already. I would recommend sewing the head to the body, then adding on the arms and legs, and adding the eyes last, as you might feel inclined to be a bit fragile with the little eye
Cut out circles of black felt for eyes and glue on
Cut out white felt in the shape of a mouth. Use black marker to draw the teeth lines. Hopefully you have a thinner marker than I had! Glue to head
Cut out blue felt in shape of a 1. Glue to white felt, then cut the white felt so that it forms a thin border around the blue 1. Glue to body
Sew wristband to wrist
Embroider black stitch marks on to the cheeks and small arms. Embroider blue and red stripes onto socks
Admire your work~
If you liked this pattern, please leave a review! If you have any questions or suggestions about the work feel free to message me on Ravelry (Zakicrochets) or instagram @ZakiCrochetsandcandles. I’m always open to suggestions. Hope you enjoyed!


Comments