Anti-Buddy
- zakicrochets
- May 10, 2023
- 3 min read
Updated: Nov 8, 2024
Here is my original pattern for a little antibody friend!

Abbreviations and Stitches used:
Sl st: Slip Stitch
Ch: Chain
Sc: Single Crochet
Inc: Increase
Dec: Decrease
Sts: Stitches
FO: Fasten off
Color 1 (Blue) is used for the constant regions
Color 2 (White) is used for the variable regions

I use a bit of immunology terminology in this pattern. The heavy chains are the inner, longer lines that makes up the "Y" in the antibody. The light chains are the lines in red in the picture to the left. Image Source: http://www.biology.arizona.edu/immunology/tutorials/antibody/structure.html
Heavy Chain (make 2)
With color 1
R1: 6 sc in a magic ring (6 sts)
R2: inc x 6 (12 sts)
R3: in back loops only, sc all around (12 sts)
R4-13: sc all around (12 sts) FO on the first heavy chain only
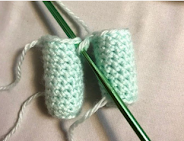
Repeat to make the second heavy chain but do NOT fasten off! Stuff both tubes up about 2/3rds
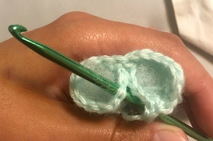
R14: Ch 1, put your hook into one of the sts of the other heavy chain and sc into that (see photo A), sc 9, chain 1, sc into the stitch that is two away from the stitch you started in (see photo B), sc 9 (22, including chains)
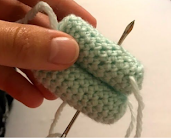
Sew through the two heavy chains to provide stability (see photo C)
Photo A Photo B Photo C
R15-19: sc around (22 sts)
Add safety eyes about 3 sts apart and sew on smile.

R20: ch 1, skip 11 sts, (see photo to right) sc 11 (12 sts)
R21-24: sc around (12 sts)
Fill completed parts with stuffing
For this part make sure you are working on the RIGHT heavy chain.
R25: inc, sc, inc, sc 2, dec, sc, dec, sc 2 (12)
R26: inc, sc, inc, sc 2, dec, sc, dec, sc 2 (12)
R27-29: Sc around (12)
R30: Sc around, sl st into first sc and change to the second yarn color (12) R31-32: sc around
Finish up stuffing
R33: Dec x 6 (6)
FO and sew closed
Now go back and fill in the LEFT heavy chain

R20 (left chain): put hook into the stitch facing the front just adjacent to the now completed right heavy chain (I’ve notated it as stitch 1 in Photo to right) and pull a new line of thread into it. Sc 10, chain 1, Sc into stitch 1 (12 sts)
R21-24: sc around (12 sts)
Stuff completed parts
R25: Sc 2, inc, Sc, inc, Sc 2, dec, Sc, dec (12)
R26: Sc 2, inc, Sc, inc, Sc 2, dec, Sc, dec (12)
R27-29: Sc around (12)
R30: Sc around, sl st into first sc and change to the second yarn color (12)
R31-32: sc around (12)
Finish up stuffing
R33: Dec x 6 (6)
FO and sew closed, sew together the top part of the heavy chains before they angle off
Light Chain (make 2)
With color 1
R1: Sc x 6 in a magic ring (6 sts)
R2: Inc x 6 (12 sts)
R3-6: Sc around (12)
R7: Sc around, sl st into the first sc, and do a color change to color 2 (12)
R8-10: SC around (12)
R11: Dec x 6 (6) FO and sew closed
Assembly:
Sew the light chains to the heavy chains in the same manner as before, going all the way through the stuffed area to provide extra stability. Don’t pull tightly though or you will pull on the opposite side of the antibody.
I hope you enjoyed! I would love to hear any suggestions or see your products! Feel free to contact or tag me on instagram @zakicrochetsandcandles or ravelry @zakicrochets.
Thank you!


Comments